
The Ultimate Exhibition Planning Checklist for Businesses: Your 2026 Strategy
Could a single missed deadline cost your business thousands in lost leads and wasted floor space? According to research by the Association of Event Organisers, 40% of exhibitors fail to meet their primary objectives due to poor pre-show logistics. You likely agree that the difference between a high-impact presence and a stressful failure often comes down to the final 48 hours of preparation. The choice between a modular shell scheme and a space-only plot is confusing enough without worrying about transport delays or complex assembly. That's why having a robust exhibition planning checklist for businesses is essential for your 2026 strategy.
This expert-led guide will help you master every stage of trade show preparation to maximise your brand impact and ROI. We've built this roadmap to alleviate the common anxieties of stand assembly and logistics. You'll learn how to secure a high-impact visual presence using versatile, tool-free hardware designed for fast turnaround. We provide a clear, chronological roadmap that covers everything from initial budget setting to efficient, tool-free setup on the day.
Key Takeaways
- Define clear strategic objectives and a realistic budget 6–12 months in advance to ensure your 2026 trade show presence delivers a measurable return on investment.
- Use this professional exhibition planning checklist for businesses to select high-impact, modular hardware that balances visual authority with the convenience of tool-free assembly.
- Master technical logistics and UK fire safety compliance early to avoid costly late-order surcharges and ensure your stand meets all venue regulations.
- Learn how to integrate strategic lighting and pre-show marketing campaigns to increase stand visibility and drive high-quality traffic to your booth.
- Discover the CokerExpo advantage of UK-made reliability and fast turnaround times, providing the robust infrastructure needed for a stress-free event execution.
Phase 1: Strategic Foundations (6–12 Months Out)
Success at a trade show doesn't happen by accident. It starts with a rigorous strategy established at least six to twelve months before the doors open. By understanding the fundamentals of exhibitions, you can align your presence with your broader commercial goals. This initial stage is the most critical part of your exhibition planning checklist for businesses; it's where you decide if you're hunting for 200 new leads or launching a specific product to 5,000 industry professionals. Without clear objectives, you're simply renting expensive floor space without a map for recovery.
Setting Measurable Goals and ROI Targets
Define success through hard KPIs. If your goal is brand awareness, track booth footfall or social media impressions. For lead generation, decide on a target number of qualified prospects before you book anything. Your budget must be comprehensive and realistic. Include the cost of the floor space, staff travel, and logistics. A significant portion of your capital should be reserved for high-impact exhibition stand design. In the UK market, floor space at major venues often accounts for approximately 30 percent of the total event spend. Use a lead-capture strategy, such as digital scanning apps, to ensure every interaction is documented for post-show follow-up.
Choosing Your Stand Type: Shell Scheme vs. Space Only
Your choice between a shell scheme and a space-only plot dictates your creative ceiling and logistical requirements. Shell schemes are cost-effective solutions for smaller businesses or those testing a new market. These packages usually include the walls, carpet, and basic lighting, making them a "plug-and-play" option that works well with modular tension fabric graphics. Space-only plots offer a blank canvas for custom builds. These are ideal for creating seamless, robust environments that demand attention on a busy floor.
When you review the floor plan, aim for high-traffic locations. Positioning your stand near main entrances or catering hubs can significantly increase spontaneous visits. A peninsula stand with three open sides often provides better visibility and access than a standard mid-row plot. This phase of the exhibition planning checklist for businesses ensures you have the right infrastructure to support your technical and aesthetic requirements for the 2026 season. Researching attendee demographics and competitor presence at specific shows is vital. If your main competitors are all at a specific event, you need a presence there just to maintain market share, but your hardware must be superior to stand out.
Phase 2: High-Impact Design and Hardware Selection
Your exhibition planning checklist for businesses must prioritise hardware that bridges the gap between aesthetic power and logistical reality. Success in 2026 relies on selecting systems that offer high visual impact without requiring a 10-person crew for installation. You need to account for structural requirements early, especially if your stand includes hanging banners or heavy product displays that require reinforced gantry systems. Integrating these elements during the design phase prevents costly on-site adjustments. For a deeper look at the methodology behind professional displays, refer to this comprehensive guide to exhibit development, which outlines the importance of aligning physical structures with your core message.The Power of Illumination: Lightboxes and LED Displays
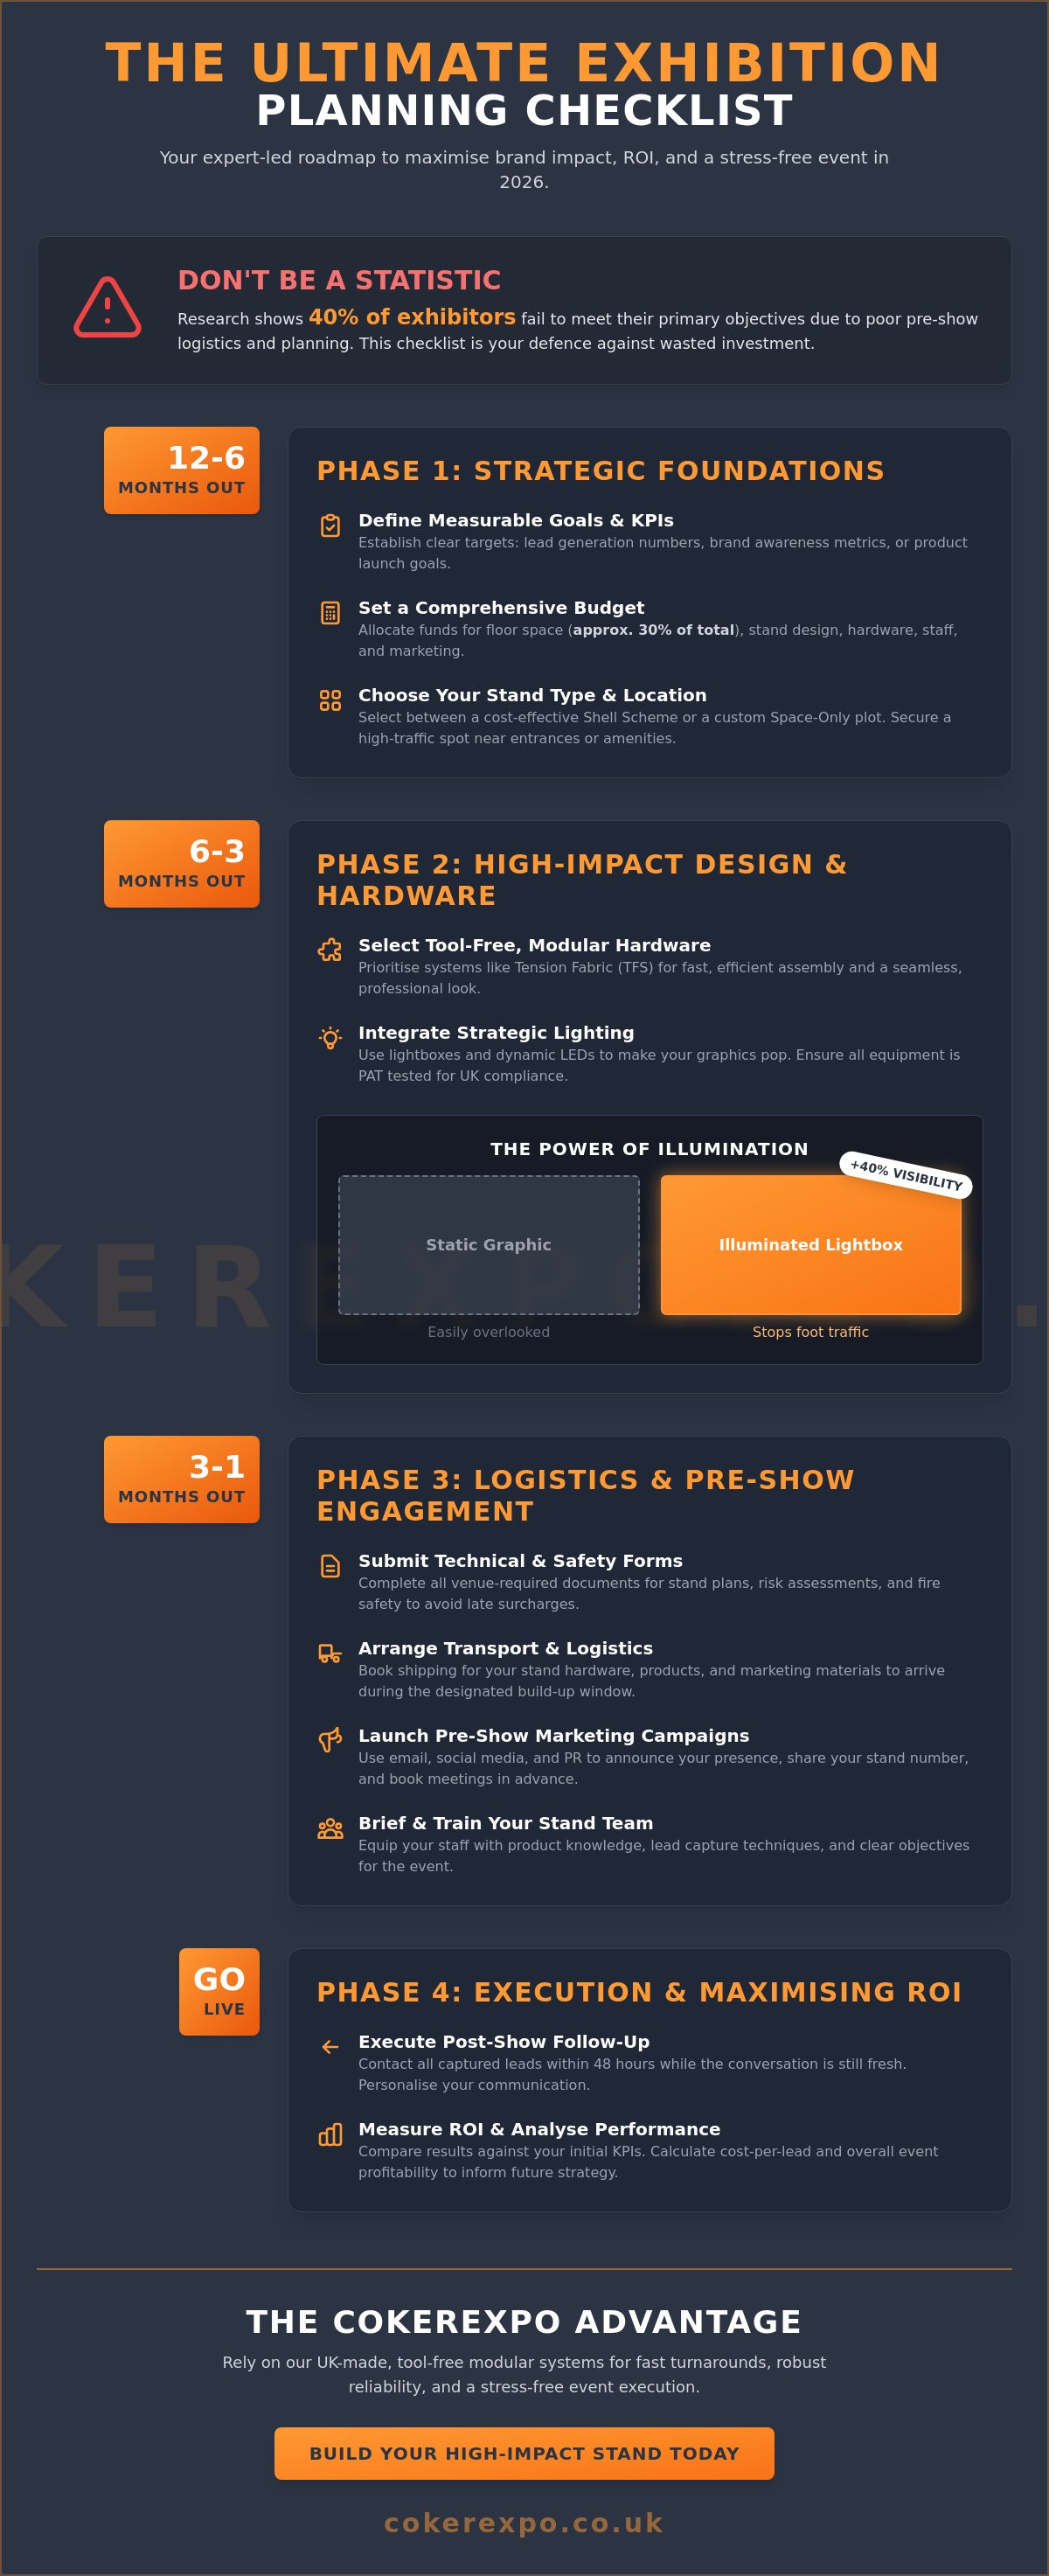
Static graphics often fade into the background. Switching to exhibition lightboxes provides a 40% increase in visibility compared to non-illuminated panels. These systems use internal LED arrays to saturate the graphic from behind, making colours pop even in dimly lit halls. Dynamic lightboxes take this further by using programmable LEDs to create animated movement within the image, which effectively stops foot traffic. In the UK, all electrical equipment must be PAT tested. Ensure your supplier provides certified hardware to avoid being shut down by venue health and safety officers during build-up. We recommend integrating lighting at the start of the design process rather than treating it as an afterthought.
Tension Fabric Systems (TFS) and Modular Frames
TFS is the current industry standard for a reason. It uses a silicone edge graphic (SEG) that stretches across a frame to create a perfectly flat, seamless surface. This eliminates the visible joins found in traditional pop-up stands. Modular frames offer the flexibility to reconfigure your layout for a 3x3m shell scheme or a larger 6x4m island site. If you're working within a pre-built booth, using high-quality shell scheme graphic panels is the fastest way to hide unsightly aluminium poles. These systems are designed for tool-free assembly, which is essential for reducing stress on the morning of the show. Key benefits include:
- Interchangeable Graphics: Swap fabric skins easily to update messaging for different target audiences or product launches.
- Portability: Large-scale fabric graphics fold down into small bags, significantly reducing shipping costs.
- Durability: Sublimation-printed fabrics are scratch-resistant and can be machine-washed.
Building a versatile kit is a vital part of your exhibition planning checklist for businesses, ensuring your hardware investment delivers a return across multiple events. If you need help deciding which frame system suits your 2026 schedule, you can view our full range of modular hardware to find the right fit for your brand.
Phase 3: Logistics, Compliance, and Team Briefing
The logistics phase is where many projects face unexpected costs. Download your exhibitor manual as soon as the organiser releases it. It's common for venues to apply a 20% to 30% surcharge on essential services like electrical drops, Wi-Fi, or forklift hire if you book them less than 21 days before the event. Incorporating these specific deadlines into your exhibition planning checklist for businesses keeps your budget from inflating. You'll also need to decide on storage. If you don't have space for large flight cases or modular frames at your office, book off-site storage that offers delivery directly to your stand space. Using a courier with experience in "time-slotted" event deliveries prevents your vehicle from being rejected at the loading bay.
UK Safety Standards and Regulatory Compliance
Safety isn't optional in the UK event industry. All tension fabric and display graphics must carry B1 or M1 fire ratings to comply with venue regulations. If your materials lack these certificates, the floor manager has the authority to prevent your stand from opening. You're also required to submit Risk Assessments and Method Statements (RAMS) through the organiser's portal at least six weeks before build-up. For larger footprints, understanding rigging requirements for truss systems is vital. These structures offer incredible height and visibility, but they require signed-off structural calculations and strict adherence to weight-loading limits for overhead safety. Always check if your stand design requires a structural engineer's sign-off before arrival.
Staffing and On-Stand Etiquette
Your hardware provides the visual impact, but your team secures the ROI. A 2024 industry study revealed that 85% of an exhibitor's success depends on the performance of the staff on the floor. Create a staff rota that limits active shifts to four hours. Fatigue leads to poor body language and missed opportunities. Brief your team on a specific elevator pitch and lead-qualification questions to filter visitors effectively. Professionalism is visual. Order branded clothing and name badges at least four weeks in advance to ensure a cohesive, expert appearance. This level of preparation is a critical element of a successful exhibition planning checklist for businesses aiming for a high-performance 2026 season.
- Review the exhibitor manual: Tag all early-bird discount deadlines to avoid late-order fees.
- Verify fire safety: Ensure all graphics are printed on fire-retardant media with valid certification.
- Prepare logistics: Schedule hardware transport and return shipping at least one month out.
- Align the team: Conduct a pre-show briefing to define lead-capture goals and engagement techniques.
Phase 4: The Live Event and Post-Show Execution
Execution is where your exhibition planning checklist for businesses moves from a strategy document to the trade show floor. Success in 2026 requires a sharp focus on the "live" window. Start your pre-show marketing campaign at least 6 weeks before the event. Reach out to your existing database via email and LinkedIn to book specific meeting slots. This ensures your stand is a destination rather than a passive display. It's about securing footfall before you even arrive at the venue.
On-site efficiency is non-negotiable. We design our modular systems for tool-free assembly, which allows your team to focus on the sales brief rather than hunting for an allen key. A 2023 survey by the Association of Event Organisers (AEO) found that 82% of exhibitors value ease of setup as a top priority. Don't waste your staff's energy on complex, frustrating builds. When the show starts, ensure you're collecting data systematically. Digital lead capture is the standard; paper notes are too easily lost in the post-show pack-down.
Invest in robust, UK-made hardware to ensure your brand looks professional from the first minute to the last. View our range of professional exhibition stands to find the right system for your 2026 calendar.
Maximising Engagement During the Show
Your promotional counters serve as the primary interaction hubs. Position them at the front of your footprint to invite conversation without creating a physical barrier. Implement live demonstrations or interactive displays to increase dwell time. Data from CEIR suggests that interactive elements can boost visitor retention by up to 33%. Simultaneously, your team must monitor social media. Use the official event hashtag to capture real-time reach and pull in visitors who are currently navigating the aisles.
Post-Event Analysis and Lead Nurturing
The show doesn't end when the hall lights go down. Effective lead nurturing is the final, critical step on any exhibition planning checklist for businesses. Categorise your leads by priority immediately. High-intent prospects require a follow-up within 48 hours while your brand is still fresh in their minds. Once back in the office, calculate your total ROI against the specific objectives you set in Phase 1. This analysis should include:
- Lead Conversion: The volume of qualified leads versus total stand visitors.
- Cost Per Lead: Total spend divided by the number of new contacts.
- Hardware Review: Assessing stand performance and durability for future use.
Our tension fabric systems and gantries are built for longevity. Reviewing how they handled the footfall helps you refine your layout for the next event. If a specific graphic didn't land or a counter felt misplaced, make those notes now. This practical feedback loop ensures your 2026 strategy remains agile and results-driven.
The CokerExpo Approach: Modular Efficiency for Businesses
Successful exhibition planning for businesses hinges on infrastructure that works as hard as your marketing team. We provide modular systems designed for the high-pressure environment of the 2026 trade show circuit. Our philosophy centres on technical precision and practical reliability. Decades of industry experience have taught us that the best hardware disappears into the background, allowing your brand message to take centre stage without the distraction of structural flaws or complex setups.
Every piece of equipment we offer is a result of refined engineering. We focus on the "user experience" of the exhibitor, ensuring that your investment provides a seamless return across multiple events. By choosing a modular approach, you gain the flexibility to adapt to different floor spaces, from small 3x3m shells to expansive island sites, without purchasing entirely new kits each time.
Tool-Free Assembly: Saving Time and Labour Costs
Modern B2B exhibitors prioritise speed and autonomy. Our "click-and-lock" modular systems eliminate the need for specialised toolkits or expensive on-site contractors. Tool-free assembly is the modern standard for B2B exhibitors who value efficiency and want to reduce on-site stress. These lightweight aluminium frames significantly lower drayage and shipping expenses. By reducing the weight of a standard display by up to 30% compared to traditional timber builds, businesses can slash logistics costs while speeding up the build-up phase.
- Reduced Labour: Your own staff can manage the build, saving hundreds of pounds in contractor fees.
- Durability: High-performance tension fabric and robust gantry systems withstand frequent transport.
- Portability: Most systems fit into compact wheeled carry cases that slide easily into a standard estate car.
Custom Solutions and Fast Turnaround
Reliability is non-negotiable when event deadlines are fixed. Because our products are manufactured in the UK, we maintain total control over quality and lead times. This local production model allows for a fast turnaround that overseas competitors simply cannot match. We don't just supply off-the-shelf kits. Our bespoke design capabilities mean we can adapt sublimation-printed graphics or modular hardware to fit unique brand requirements. Whether you need a seamless 6m back wall or a complex structure with integrated shelving, our hardware grows with your business.
If you are currently refining your exhibition planning checklist for businesses, ensure your equipment partner offers both scalability and technical support. We act as a practical specialist, providing the infrastructure for your success. Don't leave your 2026 strategy to chance. Contact CokerExpo for professional exhibition planning support to secure a robust, impactful presence at your next trade show.
Take Control of Your 2026 Exhibition Strategy
Success at a trade show isn't down to luck; it's the result of a disciplined 12 month timeline and the right infrastructure. By following this exhibition planning checklist for businesses, you've established a roadmap that covers everything from strategic foundations to post-show lead conversion. Transitioning to modular hardware is a proven way to reduce onsite stress and logistical costs while maintaining a premium brand presence.
With over 25 years of UK-based expertise, CokerExpo provides the reliable framework your marketing team needs. We specialise in versatile, tool-free modular systems that are manufactured right here in the UK for fast turnaround and robust performance. From comprehensive hire options to full event management services, we handle the technical complexities so you can focus on your visitors. It's about more than just a stand; it's about a seamless experience that delivers a clear return on investment.
Explore our range of professional exhibition display systems and start building your most impactful presence yet. We're ready to help you turn your 2026 vision into a functional, high-performance reality.
Frequently Asked Questions
How far in advance should I start planning for an exhibition?
You should start your planning process 9 to 12 months before the event date. This timeframe allows you to secure early bird booking discounts, which typically range from 10% to 15% of the floor space cost. A comprehensive exhibition planning checklist for businesses ensures you have enough time for stand design, graphic production, and marketing campaigns to drive footfall to your booth.
What is the difference between a shell scheme and a space-only stand?
A shell scheme is a pre-built modular stand provided by the organiser that includes basic walls, carpet, and a name board. Space-only gives you a blank floor area where you must build your own custom or modular structure from scratch. Space-only offers 100% creative freedom but requires more technical management and health and safety documentation than a standard shell package.
Do I need special insurance for exhibiting at a trade show?
Yes, you must have Public Liability Insurance with a minimum cover of £2 million to £5 million depending on the specific venue requirements. Most UK organisers require proof of this cover before you can access the hall for set up. You should also consider "All Risks" cover to protect your hardware and exhibits during transit and while they're on the show floor.
How can I make my shell scheme stand look more professional?
Use seamless tension fabric graphics to hide the aluminium uprights of the shell scheme frame. Adding a branded counter or a modular display system creates a custom-built feel without the bespoke price tag. Lighting is also vital; adding 2 or 3 LED spotlights can increase stand engagement by 30% compared to businesses that rely solely on standard hall lighting.
What are the fire safety requirements for exhibition graphics in the UK?
All exhibition graphics and materials must be fire-retardant to BS 5867 Part 2 Type B or equivalent European standards like EN 13501-1. You must keep a copy of the fire certificate for every material used on your stand to show venue inspectors. These inspectors carry out spot checks and can demand the immediate removal of any graphics that don't meet these UK safety regulations.
What is the best way to transport a modular exhibition stand?
Use wheeled transit cases that protect your hardware and double as branded counters during the event. Our UK-made modular systems are designed for portability, often breaking down into components small enough to fit in a standard estate car. This eliminates the need for expensive pallet couriers and simplifies the logistics at busy venues like the NEC or ExCeL London.
How do I calculate the ROI of my exhibition stand?
Divide your total revenue generated from show leads by the total cost of exhibiting, then multiply by 100 to get a percentage. For a complete picture, track your Cost Per Lead (CPL) by dividing your total spend by the number of qualified leads captured. A successful UK trade show often aims for a 3:1 or 5:1 return on investment over a 12 month sales cycle.
Can I reuse my exhibition graphics for multiple shows?
Yes, high-quality dye-sublimation fabric graphics can be reused for 5 to 10 shows if they're stored correctly. Modular frames allow you to swap graphics or reconfigure the layout for different stand sizes at future events. This durability makes them a sustainable choice for your exhibition planning checklist for businesses, reducing long-term costs by 40% compared to using single-use PVC panels.
Leave a comment