
Tension Fabric System Assembly Guide: The Professional’s Manual for 2026
Most exhibition failures don't happen because of poor design; they happen because of a rushed, incorrect installation sequence that leaves expensive graphics looking like a wrinkled mess. You've likely felt that spike of adrenaline when a deadline is looming and the fabric seems three inches too small for the frame. It's a high-pressure moment where one wrong tug could lead to a costly tear or a display that looks unprofessional under the bright lights of the trade show floor. We understand the stress of managing high-value assets in a fast-paced environment where every second counts toward your ROI.
That's why we've developed this tension fabric system assembly guide to help you master the art of the drum-tight finish every single time. By following this professional manual, you'll gain the confidence to assemble flawless lightboxes and fabric frames in record time. We'll walk through the exact structural orientation, the corner-first tensioning method, and the professional troubleshooting steps needed to ensure your display represents your brand with absolute precision. From managing complex frame joints to achieving a perfectly flat surface, this guide provides the essential infrastructure for your exhibition success.
Key Takeaways
- Learn why modular aluminium frames and Silicone Edge Graphics (SEG) are the professional choice for achieving high-impact, seamless exhibition walls.
- Follow this tension fabric system assembly guide to verify site conditions and inventory, ensuring a flawless build from the very first connection.
- Master the structural mechanics of connecting base rails and horizontal support stays to maintain frame integrity for displays exceeding two metres.
- Implement the "4-corner method" for keder insertion to distribute fabric tension evenly and eliminate unsightly wrinkles or sagging.
- Discover professional dismantling and maintenance techniques, such as inward-folding, to protect your graphic investment for future event cycles.
Understanding the Tension Fabric System (TFS) Architecture
The Tension Fabric System (TFS) is the pinnacle of modern exhibition hardware. It's a modular aluminium frame system designed specifically to support Silicone Edge Graphics (SEG). While basic displays might use clips or velcro, the TFS relies on precision-engineered extrusions. These provide the structural integrity needed for large-scale, seamless walls. This structural logic is similar to that found in tension fabric buildings, where material tension provides both form and strength. Understanding these components is the first step in any effective tension fabric system assembly guide.
Professional exhibitors prioritize TFS because it eliminates the visible seams and bulky borders associated with traditional panelling. The system consists of three primary elements: perimeter profiles that form the outer boundary, corner connectors that ensure 90-degree precision, and horizontal or vertical support stays. These stays are critical. They maintain stability in frames exceeding two metres, preventing the aluminium from bowing under the immense pressure of the tensioned fabric. Without these precision components, the frame can't deliver the perfectly flat surface required for high-end branding.
The Anatomy of a Silicone Edge Graphic (SEG)
The "tension" in this tension fabric system assembly guide refers to the interaction between the frame's recessed channel and the keder. A keder is a thin silicone or PVC strip sewn directly into the perimeter of the fabric graphic. When you press this strip into the frame’s groove, it creates a mechanical lock that pulls the fabric taut across the entire surface. For the best results, dye-sublimation printing is preferred over UV-printed alternatives. Dye-sublimation allows the ink to bond with the polyester fibres. This maintains the fabric's natural elasticity, which is essential for achieving a drum-tight finish without cracking the image or causing distorted graphics.
Why Professional Assembly Matters for Brand ROI
A flawless installation is a direct reflection of your brand's attention to detail. When a display is assembled poorly, the result is often sagging fabric, light leaks at the corners, or distracting shadows across the graphic face. These technical failures diminish the impact of exhibition stand design, signaling a lack of care to potential B2B partners. Investing in professional-grade TFS means you're buying more than hardware; you're securing a reliable infrastructure. It ensures your marketing message remains flat, vibrant, and perfectly aligned, regardless of the venue's conditions. This reliability is what turns a simple display into a sound business investment.
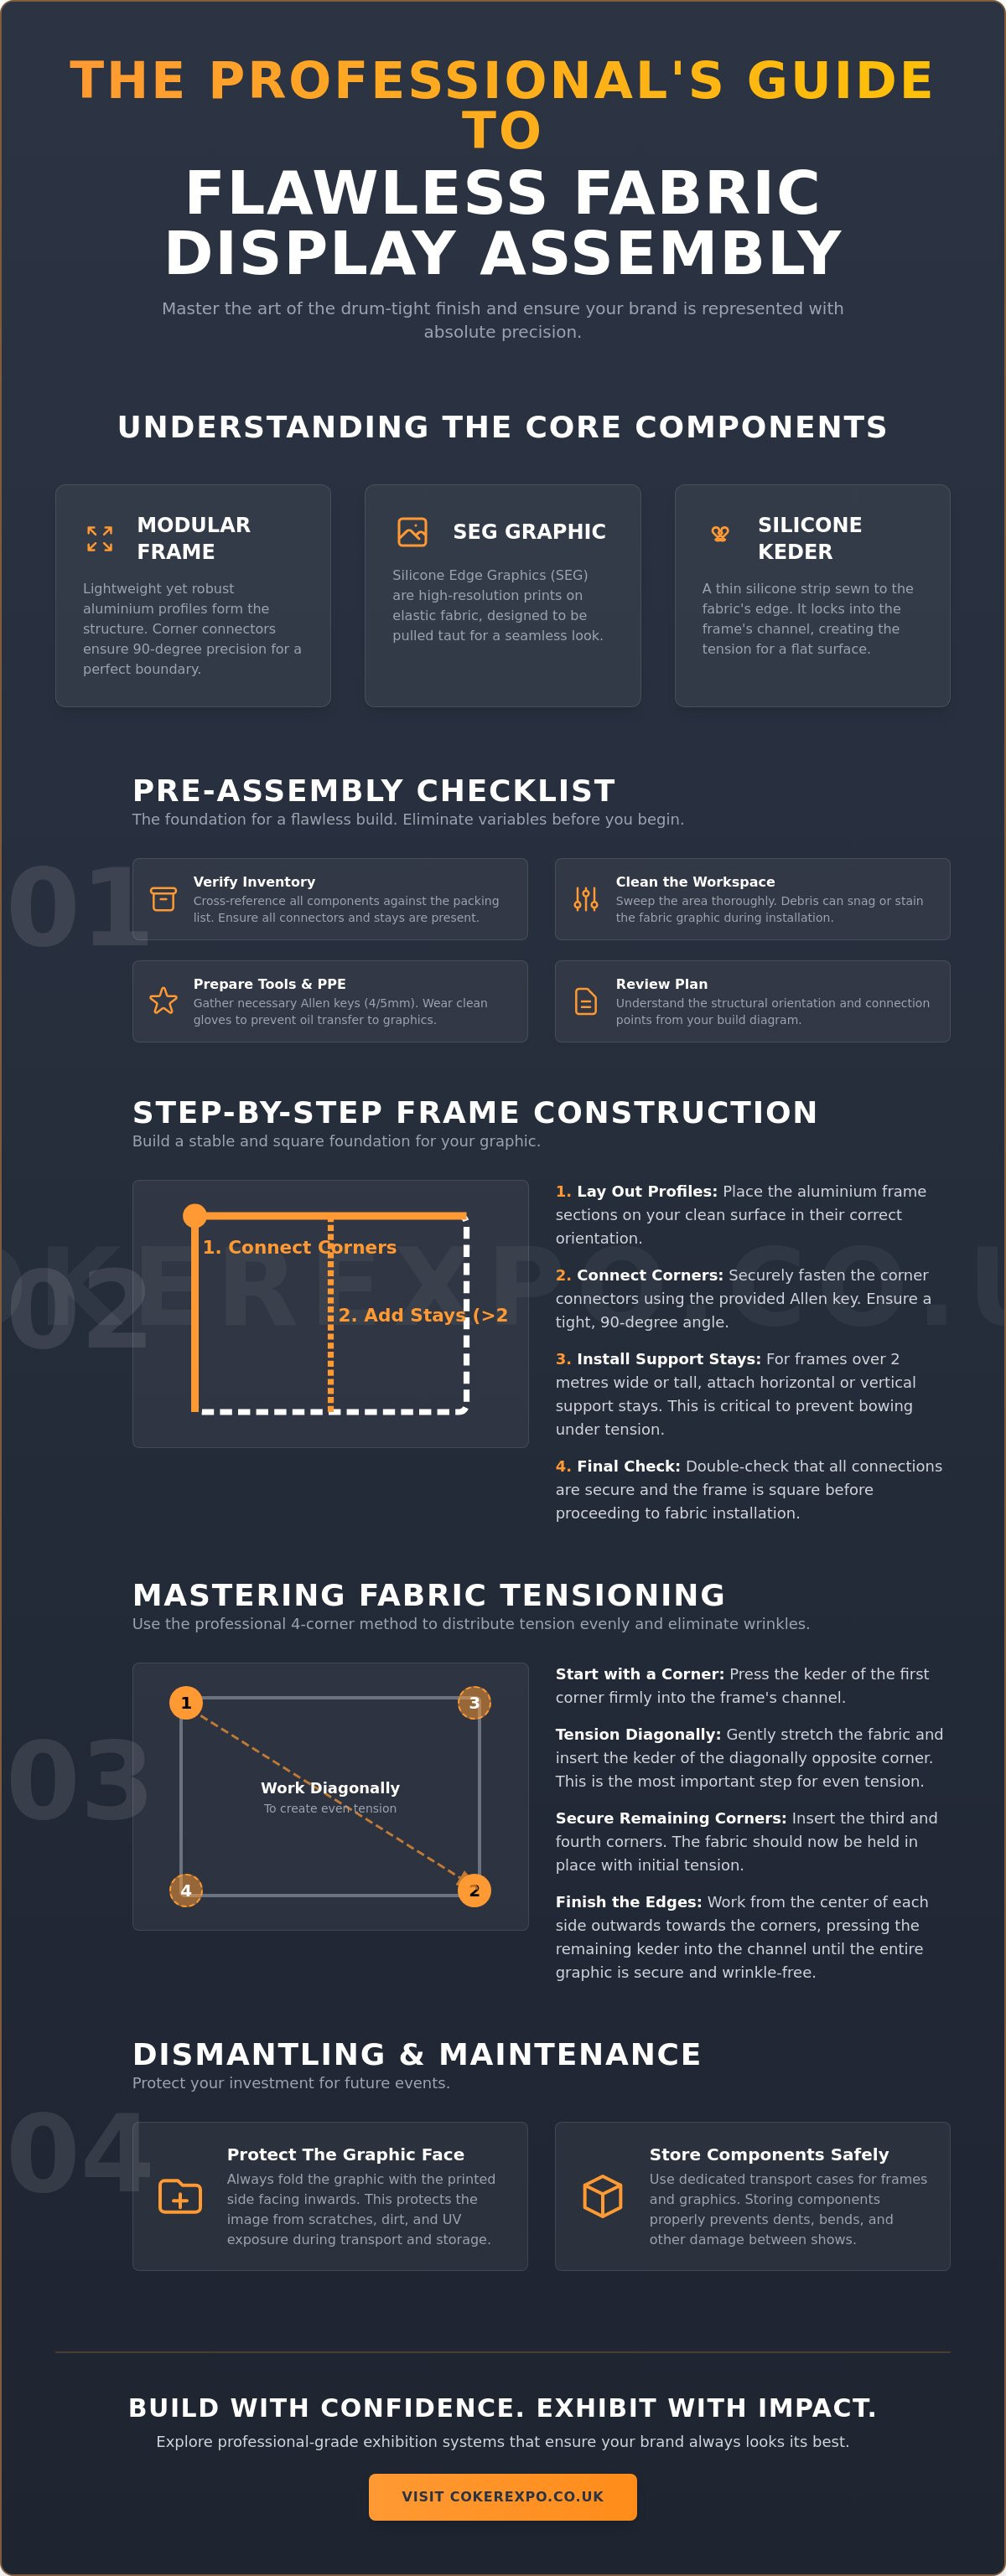
Pre-Assembly Checklist: Preparing for a Flawless Build
Successful installation begins long before the first bracket is tightened. A thorough pre-assembly phase is the foundation of any reliable tension fabric system assembly guide. The primary goal is to eliminate variables that lead to delays or physical damage on the high-pressure exhibition floor. By systematising your preparation, you ensure that the final display meets the professional standards your brand requires. This phase is about more than just logistics; it's about protecting your financial investment from avoidable errors.
Start with the floor. Debris is the primary enemy of high-performance fabrics. Even a small piece of grit or a stray metal shaving from a neighbouring stand can cause a permanent snag or a dark stain on a light-coloured graphic. Ensure the entire workspace is swept and, if possible, cordoned off with safety tape. Establishing a clear working perimeter prevents other contractors or venue staff from accidentally stepping on your components. Health and safety protocols aren't just for compliance; they create a controlled environment where you can focus on technical precision without distraction.
Cross-reference your packing list immediately upon arrival. You'll typically need a standard set of Allen keys, usually 4mm or 5mm, and specific tensioning tools provided with the hardware. Don't overlook personal protective equipment. Clean, protective gloves are essential for handling raw aluminium extrusions and preventing oil transfer to the graphics. The Tension Fabric Internal Structure relies on precise alignment to function as intended, so ensuring every connector and support stay is present and undamaged is non-negotiable for a drum-tight finish.
Organising Your Frame Components
Layout your extrusions on the floor in their approximate final positions before attempting any connections. Manufacturers usually mark top, bottom, and side rails with specific stickers or numerical engravings. Check these against your assembly diagram to ensure the orientation is correct. Inspect corner connectors and mid-section joiners for any signs of transit damage. It's much easier to address a slightly misaligned bracket while the frame is on the floor than when you're three metres in the air during the final build phase.
Fabric Handling and Protection
Your graphics are the most vulnerable part of the kit. Keep them in their protective bags until the frame is fully upright and secured. Use clean cotton gloves whenever you touch the fabric to avoid leaving fingerprints that can become visible under bright event lighting. If you must lay the graphic out during the process, ensure the floor is covered with a fresh plastic sheet or a clean drop cloth. If you're looking for high-performance TFS Tension Fabric systems, starting with these hygiene habits ensures your brand's visual impact remains pristine throughout the show.
Step-by-Step TFS Frame Assembly Instructions
Constructing the structural skeleton of your display requires mechanical precision. You've organized your components; now it's time to build the foundation that supports your brand's visual assets. This tension fabric system assembly guide focuses on the mechanical logic required to create a rigid, perfectly aligned structure. Unlike basic modular systems, the TFS relies on tight tolerances. Small misalignments at the start of the build will amplify as you add height and width, leading to significant fitment issues later.
Assembling Corner Connectors
Begin by sliding the corner connectors into the perimeter profile channels. Align the connector with the pre-drilled holes in the aluminium extrusion. You'll use your Allen key to tighten the grub screws, but only moderately at this stage. It's a common mistake to over-torque screws immediately. Instead, keep them just tight enough to hold the shape while allowing for minor adjustments. Verify that the profile mitres meet flush without any visible gaps. A clean, seamless edge at the corner is the first indicator of a professional build.
Installing Support Stays and Bracing
Horizontal and vertical support stays are non-negotiable for frames exceeding 2 metres in width or height. These internal braces prevent the perimeter profiles from bowing inward once the fabric is tensioned. Lock the stays into the internal channel of the main frame profiles using the provided hardware. It's vital to ensure these stays don't interfere with the SEG channel on either side. If a stay is positioned too far forward or back, it will create a visible bulge or shadow on your graphic face, undermining the premium aesthetic of your fabric frames.
The most critical step in this tension fabric system assembly guide is squaring the frame. Even if the corners look correct, the frame can easily become a slight rhomboid shape. Use a tape measure to check the distance between opposite corners. If the two diagonal measurements aren't identical, the frame isn't square. Gently shift the frame until the diagonals match exactly. Once you've achieved this perfect 90-degree fit, perform the final tightening on all grub screws and locking mechanisms. A rigid, level frame is the only way to ensure your graphics sit flat without wrinkles.
Before you even think about the fabric, position the frame in its final location. Moving a fully tensioned frame is difficult and risks warping the aluminium. Ensure the structure is stable and, if necessary, attach the required feet or base plates. If you're using lightboxes, this is also the time to check your internal cabling. Once you've confirmed the frame is secure and square, you're ready to master the tensioning process.
Mastering the Fabric Tensioning: The 4-Corner Method
Once the frame is square and secure, the focus shifts to the graphic. Achieving a drum-tight finish isn't about brute force; it's about the systematic distribution of tension. This tension fabric system assembly guide recommends the 4-corner method to prevent the material bunching that often plagues amateur installations. If you start at one end and work your way across, you'll likely find you have excess fabric at the final corner. This results in unsightly waves or "smiles" in the print that undermine your brand's professional impact.
Begin by inserting the silicone keder into the four corners of the frame. Push the keder deep into the channel until it's fully seated. Once the corners are locked, move to the exact centre point of each rail. By securing the centres next, you divide the tension into manageable segments. From here, work from the centres outward toward the corners in small, controlled increments. You can use a dedicated keder tool for this, but the heel of your hand is often more effective for sensing the correct pressure and ensuring the strip is seated without snagging the polyester.
Troubleshooting Common Fitment Issues
Even with a methodical approach, fitment issues can occur. If you notice wrinkles in the centre of the graphic, it usually indicates uneven tensioning during the initial push-in. Remove the keder in that specific section and re-tension from the nearest corners. If the fabric feels too tight to reach the channel, don't force it. Re-measure the frame diagonals as discussed in the previous section. A frame that's even slightly out of square will make installation nearly impossible. If the keder keeps popping out, inspect the channel for debris or leftover packaging material that might be obstructing the mechanical lock.
Achieving a Drum-Tight Professional Finish
The final step is the "thumb run." Run your thumb along the entire perimeter, applying firm pressure to ensure the keder is seated to the bottom of the channel. Step back and inspect the graphic under the actual show lighting. Look for any sagging or "light leaks" where the fabric might have pulled away from the frame edge. If you are working with backlit lightboxes, check for shadows caused by internal cabling or support stays. A truly professional finish should look like a solid, painted wall rather than a temporary fabric display.
For those requiring high-impact hardware that simplifies this process, explore our range of TFS Tension Fabric systems designed for rapid deployment and maximum durability.
Post-Show: Dismantling and Fabric Maintenance
The success of your next exhibition depends on how you handle your hardware today. While the pressure to vacate the hall is often intense, rushing the dismantle process is the fastest way to damage your investment. This final section of our tension fabric system assembly guide covers the critical steps needed to preserve your graphics and aluminium frames for years of repeated use. Treat your system as a reusable asset rather than a single-use display.
Always use the pull-tab to remove the keder from the frame channel. Most professional graphics include this small loop for a reason. It allows you to release the mechanical lock without tugging on the fabric itself. If your graphic lacks a tab, gently use the side of your thumb to ease a corner out first. Once the fabric is free, fold it with the print side facing inward. This simple habit prevents surface scratches and stops ink migration during storage. Store all graphics in a cool, dry environment. Direct sunlight is the enemy of vibrant dye-sublimation prints and can lead to premature fading.
Before packing the aluminium profiles, inspect them for burrs or physical damage. Scratches on the metal can create sharp edges that will snag your fabric during the next installation. If you find a rough spot, a light sanding with fine-grade paper can often resolve the issue. Ensuring your fabric frames are clean and smooth before they go back into their bags is a hallmark of professional event management. It's a small step that prevents a major logistical headache at your next show.
Cleaning and Caring for Your Graphics
Minor marks are inevitable on the trade show floor. You can spot clean these using a damp, lint-free cloth and a mild detergent. Don't use aggressive rubbing or harsh chemicals; these can break down the dye-sublimation fibres and leave permanent dull spots. Always check your fire-rating labels during this process. UK venues have strict compliance standards, and ensuring your graphics remain fire-retardant is essential for future access to major exhibition halls.
Upgrading and Refurbishing Your System
The beauty of the TFS is its longevity. You don't need to replace the entire system to refresh your brand. Ordering new graphics for existing frames is a cost-effective way to maximise your hardware investment. For larger, more complex integrations, you might consider combining your frames with truss structures to create high-level branding. If you need bespoke replacement parts or wish to extend your current frame dimensions, contact CokerExpo for expert guidance on modular expansion and system refurbishments.
Elevating Your Brand Presence with Technical Precision
Mastering the mechanics of frame squaring and the nuances of the 4-corner tensioning method transforms a standard display into a powerful marketing tool. These technical skills separate a professional exhibit from a mediocre one. By adhering to the structural protocols and maintenance habits outlined in this tension fabric system assembly guide, you ensure your display remains a reliable business asset for years. A drum-tight finish isn't just an aesthetic choice; it's the baseline for high-impact branding in a competitive B2B environment.
Ready to secure the essential infrastructure for your next successful event? Explore CokerExpo’s Professional Tension Fabric Systems to discover the difference that durable aluminium extrusions and precision-printed SEG graphics make. Our UK-based expert support team provides the reliability and technical knowledge you need to handle any bespoke request with total confidence. Your brand deserves a flawless professional impact every time you step onto the exhibition floor.
Frequently Asked Questions
Do I need special tools to assemble a tension fabric system?
Most systems require a standard 4mm or 5mm Allen key to secure the corner connectors and support stays. While some high-performance systems use tool-free locking mechanisms, it's vital to check your specific kit before arriving at the venue. A dedicated keder tool can assist with seating the silicone strip, but the heel of your hand is often sufficient if you follow the correct tensioning sequence.
Can one person assemble a large TFS frame alone?
One person can manage small displays, but frames exceeding two metres in height or width usually require two people for safe handling. Attempting to lift or square a large aluminium structure alone increases the risk of warping the profiles or scratching the floor surface. Having a second person ensures the frame remains stable and square during the critical tensioning phase of this tension fabric system assembly guide.
How do I remove wrinkles from my tension fabric graphic?
Most wrinkles disappear naturally once the fabric is properly tensioned within the frame channel. If stubborn creases persist, you can use a handheld steamer on the reverse side of the material, keeping it at a safe distance to avoid fibre damage. Using the corner-first method is the most effective way to eliminate sagging and waves from the outset, ensuring a flat, professional surface.
Is tension fabric fire rated for UK exhibition venues?
Professional-grade tension fabrics are treated to meet UK fire safety standards, such as BS 5867 or the European EN 13501-1 equivalent. Venue managers at major UK exhibition centres require proof of compliance before you can open your stand. You should always ensure your graphic has a visible fire-rating label or keep the physical certificate on hand during the build to avoid logistical delays.
Can I wash my tension fabric graphics if they get dirty?
You can wash most dye-sublimated polyester graphics in a standard washing machine on a cool, gentle cycle with mild detergent. Avoid bleach or fabric softeners, as these can degrade the silicone keder or the print quality. It's best to air dry the fabric by re-installing it onto the frame while damp, which allows it to dry under tension and prevents any potential shrinkage.
What is the difference between TFS and a standard pop-up display?
A TFS uses a rigid aluminium perimeter frame to pull the fabric taut, creating a seamless finish that resembles a solid, permanent wall. Standard pop-up displays rely on a collapsible lattice structure with magnetic panels or velcro-attached fabric. This tension fabric system assembly guide focuses on the rigid frame method because it offers superior durability and a more premium aesthetic for high-stakes professional environments.
How long does it typically take to assemble a 3x3m TFS wall?
A standard 3x3m frame typically takes two experienced operators approximately 20 to 30 minutes to assemble. This estimate includes the time needed to square the frame and seat the graphic using the 4-corner method. Factors such as the presence of internal support stays or integrated lighting can add time, so it's wise to budget at least 45 minutes for a first-time installation to ensure a perfect finish.
Leave a comment