
How to Hang Banners on a Shell Scheme: The Professional Exhibitor’s Guide
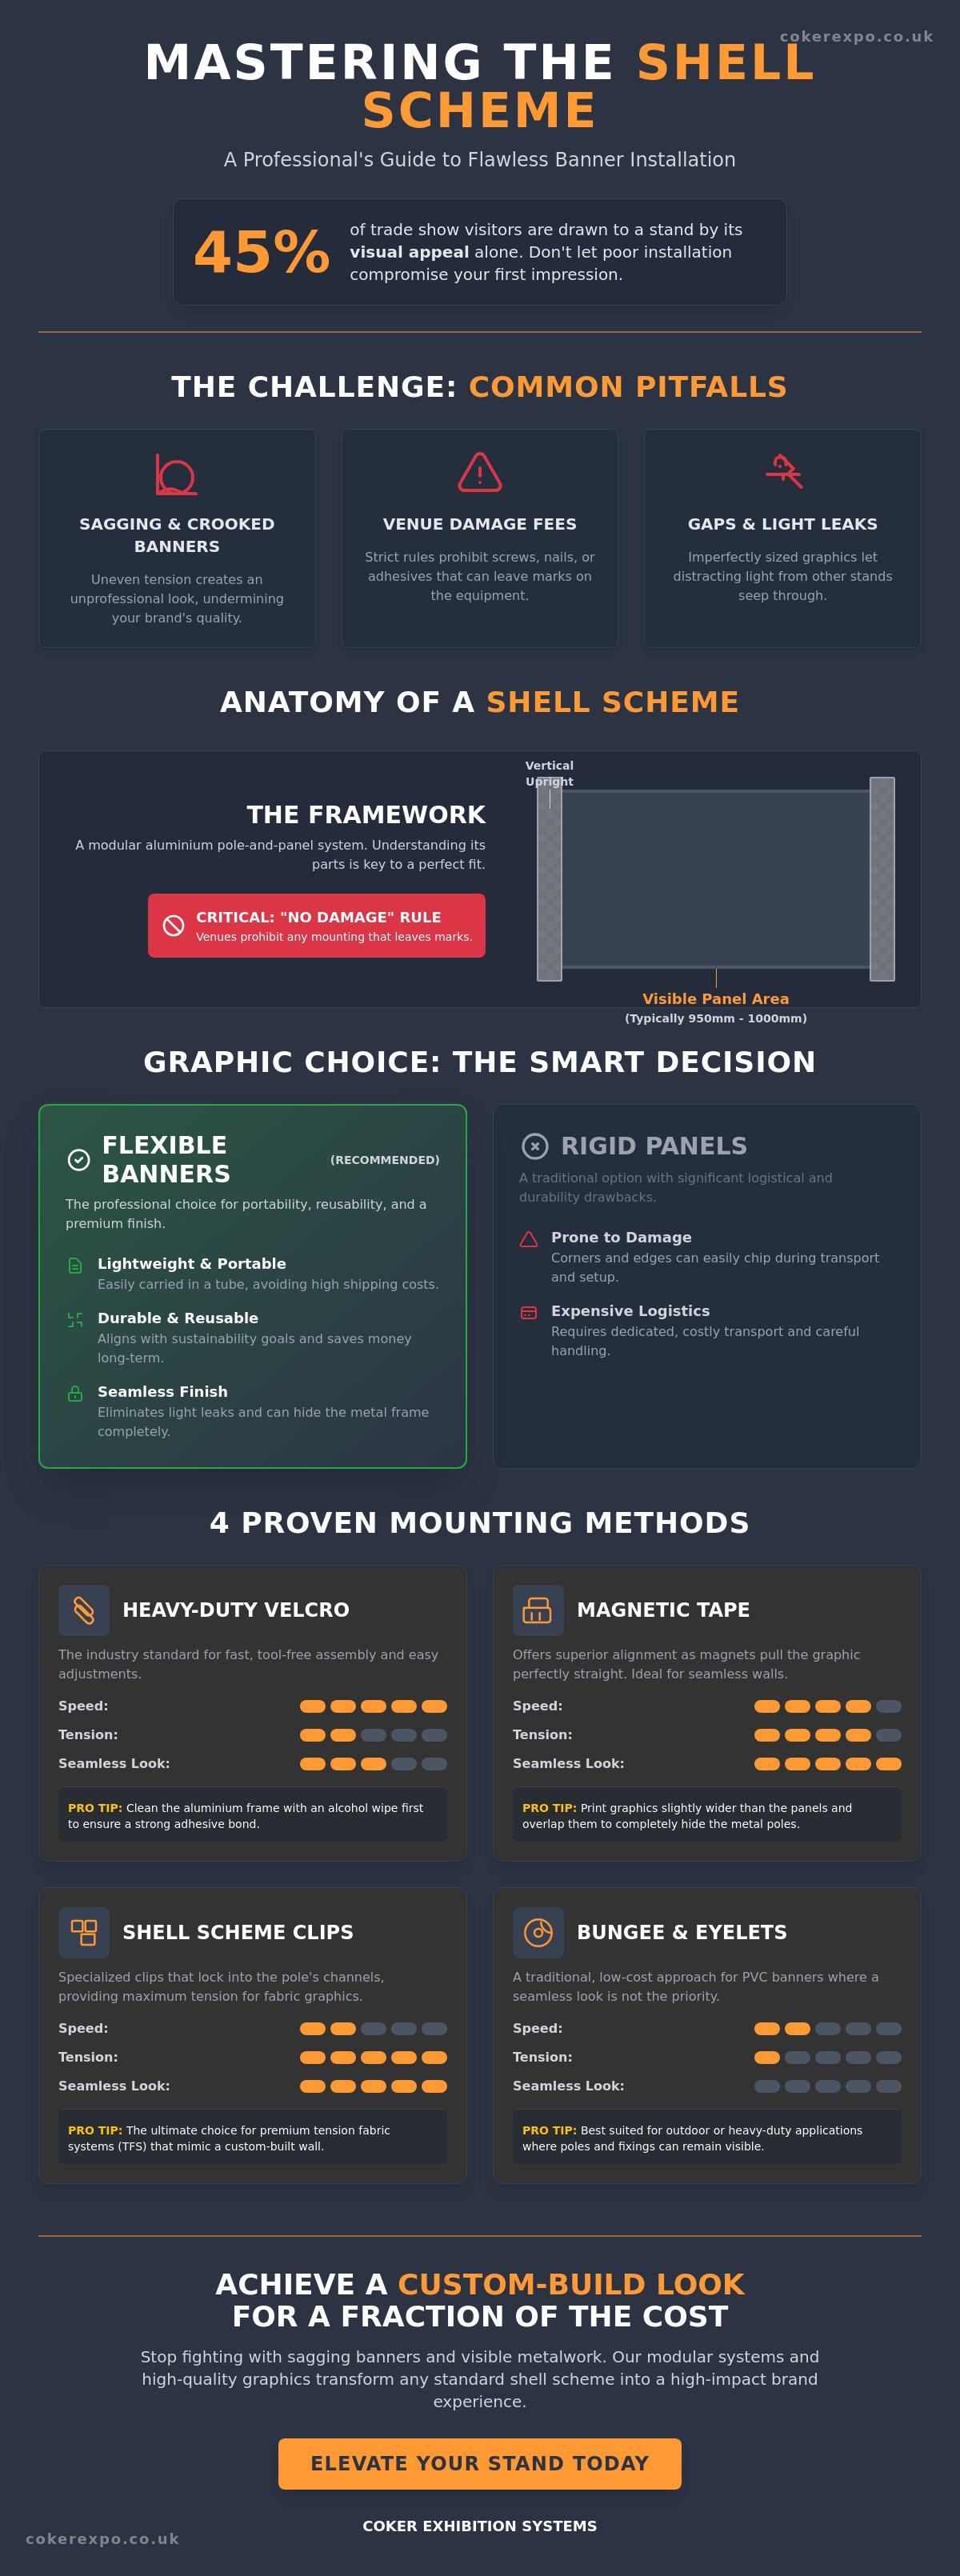
With 45% of trade show visitors drawn to a stand by visual appeal alone, a sagging or crooked banner is more than just a minor eyesore; it's a lost business opportunity. Most exhibitors arrive at the venue expecting a simple setup, only to face the technical reality of Octanorm poles and strict rules against adhesives. You've likely felt the pressure of trying to create a premium brand experience while worrying about venue damage charges or graphics that look "cheap" because they lack proper tension. It's frustrating to see high-quality designs lose their impact due to poor mounting hardware.
This guide explains exactly how to hang banners on a shell scheme to achieve a perfectly flat, professional finish that mimics a custom build. While shell scheme upgrades can cost upwards of £1,000, the right attachment strategy provides a high-end look for a fraction of the price. We'll cover tool-free assembly methods that allow for a fast setup on the morning of your event. You'll learn how to secure reusable graphics safely, ensuring your display remains robust and impactful throughout the show without damaging the venue's equipment.
Key Takeaways
- Identify exact shell scheme dimensions to ensure your graphics align perfectly with the modular aluminium framework.
- Master the professional techniques for how to hang banners on a shell scheme using heavy-duty Velcro or magnetic tape for a secure, tool-free installation.
- Apply the principles of tension to eliminate unsightly sagging and prevent light leakage from neighboring stands.
- Choose between durable PVC and premium Tension Fabric based on your specific event goals and the official venue regulations.
- Discover how modular systems like TFS can transform a basic shell scheme into a high-impact, custom-look brand experience.
Understanding the Shell Scheme Framework
A shell scheme is the modular aluminium pole-and-panel system provided by organisers at almost every trade show in the UK. It serves as a blank canvas, but it comes with strict physical constraints. Understanding the framework is the first step in learning how to hang banners on a shell scheme without incurring venue damage fees. Most systems, such as Octanorm or Sodem, rely on a series of vertical uprights and horizontal beams that hold standard 3mm or 4mm thick panels in place. These systems are designed for rapid assembly, but they aren't always intuitive for mounting custom graphics.
Dimensions are the most critical factor. While a stand might be 3 metres wide, the individual panel widths are often 950mm or 1000mm depending on the specific system used. Measuring the visible area between the aluminium poles is vital. If your banner is even slightly off, the tension will be uneven, leading to the sagging issues many exhibitors fear. You also must respect the "No Damage" rule. Venues strictly prohibit the use of nails, screws, or permanent adhesives on their hardware. Any marks or residue left behind can result in significant surcharges after the event, making non-invasive mounting hardware essential.
Anatomy of a Shell Scheme Wall
The structure consists of vertical uprights and horizontal cross-beams. The uprights are the 8-sided poles that provide the main support, while the horizontal beams slide into these uprights to create the frame for the infill panels. Mastering the physics of this frame is the secret to how to hang banners on a shell scheme with a professional finish. You have two primary choices: internal or external mounting. Internal mounting fits the banner within the frame, leaving the aluminium poles visible. External mounting involves fixing graphics over the poles to create a seamless wall. Most professional exhibitors now opt to hide the metalwork entirely to create a custom-build aesthetic.
Why Flexible Banners Over Rigid Panels?
Flexible banners offer a distinct advantage in portability and cost-effectiveness. A single marketing manager can carry a full set of graphics in a lightweight tube, avoiding the logistical headache of shipping large, fragile Foamex boards. Rigid panels are prone to corner damage and require expensive dedicated transport. In contrast, high-quality PVC or tension fabric banners are robust and reusable. Sustainability is a growing priority for 68% of attendees, and choosing reusable fabric graphics over single-use materials aligns with this expectation. Fabric banners also eliminate the risk of light leakage from the booth behind you, ensuring your brand remains the focal point.
Choosing the right attachment method determines whether your stand looks like a professional brand activation or a temporary DIY effort. Because 45% of visitors are drawn to a booth by its visual appeal, the hardware you use is just as important as the graphic design itself. There are four primary technical methods for how to hang banners on a shell scheme, each offering a different balance of speed, tension, and aesthetic finish.
- Heavy-Duty Velcro: This is the most versatile industry standard, allowing for rapid adjustments during the morning setup.
- Magnetic Tape: Ideal for systems with steel components, providing a "snap-on" finish that ensures graphics sit perfectly flush.
- Shell Scheme Clips (T-Clips): These specialized plastic or metal clips lock into the recessed channels of the uprights, providing the high tension required for fabric graphics.
- Bungee Ties and Eyelets: A traditional approach for PVC banners that prioritizes durability and low cost over a seamless appearance.
The Velcro Method: Speed vs. Security
Velcro is the preferred choice for exhibitors who value a fast, tool-free assembly. For the best results, always apply the self-adhesive "hook" side to the aluminium frame and the "loop" side to the back of the banner. This configuration prevents the banner from snagging on other materials during transport. Cleaning the aluminium frame with a 70% isopropyl alcohol wipe is the most ignored but vital step to ensure the adhesive bonds permanently to the metal rather than a layer of microscopic dust. If you're looking for high-quality Shell Scheme Graphic Panels, ensuring the mounting surface is prepped will prevent your display from peeling away mid-show.
Magnetic and Clip-In Systems
Magnetic strips offer a superior vertical alignment compared to Velcro because the magnets naturally find their point of highest attraction, pulling the banner into a straight line. This method is particularly effective for creating a "seamless" wall. By printing your banners slightly wider than the panel width, you can overlap the graphics to hide the metal uprights entirely. T-clips take this a step further by utilizing the internal geometry of the Octanorm system. These clips twist into the vertical groove, allowing you to pull the banner taut across the entire width of the stand. This high-tension approach eliminates the horizontal ripples often seen in lower-quality setups, resulting in a robust and impactful display that rivals expensive custom builds.
Overcoming Common Challenges: Sagging, Alignment, and Gaps
The transition from a 2D design to a 3D exhibition hall often reveals technical hurdles that can compromise your brand's impact. Understanding how to hang banners on a shell scheme requires more than just hardware; it requires an understanding of physics and environmental factors. Gravity is the primary enemy of the flexible banner. Without consistent lateral tension, PVC and fabric graphics naturally sag in the centre, creating unsightly ripples that catch the light. This effect is amplified over long distances. If you're managing a 6-metre run, a mere 2mm misalignment on the first panel can result in a 12mm gap by the end of the wall. Using the top horizontal beam as a hard reference point is essential to keep graphics level across the entire stand.
Environmental conditions also play a significant role. Exhibition halls are notorious for temperature fluctuations, often rising from 15°C during the build to over 25°C when the show opens and footfall increases. PVC graphics can expand slightly in these conditions, leading to unexpected slack. High-quality fabric alternatives are more stable, but they face the challenge of light leakage. If the booth behind you is brightly lit, your graphics may suffer from "shadowing," where the internal frame of the shell scheme becomes visible through your banner. Using blockout materials or high-density weave fabrics prevents this, ensuring your visuals remain crisp and professional.
Achieving the Seamless Look
Many competitors claim that banners will always have visible gaps between panels. This is a misconception. To achieve a seamless finish, you must calculate a "bleed" or overlap of approximately 15mm to 20mm. This allows the graphic to wrap slightly around or over the aluminium uprights. Using premium shell scheme graphic panels designed for edge-to-edge coverage transforms the modular frame into a continuous brand wall. If you're using separate banner drops, "infills" can be used to bridge the 40mm gap created by the vertical poles, effectively hiding the metalwork and creating a custom-build aesthetic without the custom-build price tag.
Lighting Your Banners for Impact
Visual appeal draws in 45% of trade show visitors, but poor lighting can render the best graphics invisible. Long-arm LED spotlights are the standard solution, but they must be positioned carefully. High-gloss PVC banners are prone to glare, which can obscure your key messaging or contact details. Position lights at a 45-degree angle to minimize reflections. For a more modern approach, integrating exhibition lightboxes within your banner run creates a dynamic focal point. These backlit elements break up the flat wall and ensure your stand remains impactful even in the dimly lit corners of a large venue.
Step-by-Step: Preparing Your Graphics for a Flawless Install
Preparation begins long before you arrive at the venue. To master how to hang banners on a shell scheme, you must first verify your stand dimensions using the official organiser’s manual. Never guess these measurements. Even a 5mm discrepancy can cause graphics to buckle or sag. Ideally, you should book your graphic production at least 12 weeks before the event. This avoids the 15% rush fees common in the industry and ensures you have time for a test build. Once dimensions are confirmed, choose your material based on the show's duration and your travel logistics. PVC offers rugged durability, while Tension Fabric provides a premium, matte finish that eliminates overhead glare.
The most efficient exhibitors pre-apply all attachment hardware at their office. Applying Velcro or magnetic strips in a controlled environment ensures the adhesive cures properly, which is impossible in a dusty exhibition hall. Always pack an "Emergency Kit" containing extra Velcro, a spirit level, and microfibre cloths. This kit acts as your insurance policy against unexpected on-site variables. When you begin the install, use the gravity-assisted method: align and secure the top edge first, then let the banner hang naturally before tensioning the sides and bottom.
The Pre-Show Checklist
Safety and organization are paramount. Every venue requires graphics to meet specific fire safety standards, typically B1 or M1 certifications. Ensure your supplier provides these certificates upfront. To prevent permanent creases, always roll your banners with the print side facing out; never fold them. Clearly label each roll to correspond with your exhibition stand design floor plan. This simple step eliminates confusion on the morning of the show, allowing for a fast, tool-free assembly that keeps your team focused on networking rather than troubleshooting.
On-Site Execution
Installing wide-format banners is a two-person task. One person holds the weight and maintains the horizontal level while the other secures the adhesive or clips. Use a plastic squeegee to apply firm pressure along the entire length of the Velcro or magnetic strips. This removes air pockets and ensures a robust bond. If you encounter a slight misalignment, the modular nature of the shell scheme allows for minor adjustments. Finish the process by applying tension to the bottom beam. A drum-tight finish is the hallmark of a professional display. For those who want to skip the complexity of manual tensioning, our tool-free display systems provide a perfect install every time.
Beyond Basic Banners: Elevating Your Stand with CokerExpo
While basic banners are an excellent entry point for new exhibitors, high-frequency brands often require a more robust, seamless solution. If you have already mastered the basics of how to hang banners on a shell scheme but want to eliminate the visible aluminium poles entirely, Tension Fabric Systems (TFS) are the logical evolution. These modular systems provide a high-impact finish that mimics a custom-built stand at a fraction of the investment. At Coker Expo, our focus is on tool-free assembly. We understand that the morning of a trade show is a high-pressure environment. You don't need the stress of complex tools or missing components. Our hardware is designed for speed and reliability, ensuring your infrastructure is ready for visitors in minutes.
Every system we provide is made in the UK. This local production is vital because it ensures our frames and graphics are perfectly calibrated for the specific shell scheme systems used in British venues. Whether you're exhibiting at the NEC, ExCeL, or local regional centres, our products fit the first time. Some exhibitors prefer a "hybrid" approach for maximum versatility. This involves combining large-format banners with professional folding display boards. This setup allows for modularity, giving you the ability to swap out specific panels for different product launches without replacing your entire backdrop.
The TFS Advantage
Silicone Edge Graphics (SEG) are the secret to the TFS "hard-wall" appearance. By tucking a thin silicone bead into a recessed frame, the fabric is pulled under extreme tension. This creates a perfectly flat surface with zero ripples, sagging, or light leakage. It's a significant visual upgrade from standard banners and is preferred by 68% of exhibitors who want to project a premium brand image. You can even integrate dynamic elements, such as backlit lightboxes or display turntables, directly into the fabric wall to increase visitor dwell time and stand out in a crowded hall.
Professional Support and Planning
Success at a trade show involves more than just knowing how to hang banners on a shell scheme; it requires meticulous planning. Our event management and planning services take the technical logistics off your plate. We specialize in bespoke sizes that fit every UK venue configuration, ensuring your brand message is never cut off by a poorly placed upright or beam. From initial design to the final tool-free assembly on-site, we provide the infrastructure for your success. View our full range of Shell Scheme Graphic Solutions to find the perfect system for your next event.
Master Your Next Exhibition Setup
Success on the trade show floor depends on the technical execution of your display. By mastering how to hang banners on a shell scheme using precision measurements and high-tension hardware, you transform a standard modular booth into a high-impact brand destination. Verified data shows that 45% of visitors are drawn to a stand by visual appeal alone, making a perfectly flat, seamless finish a critical business investment. Whether you choose the speed of heavy-duty Velcro or the "snap-on" precision of magnetic strips, proper preparation ensures your graphics remain robust throughout the event.
Coker Expo has provided expert advice and technical solutions for over 25 years in the exhibition industry. Our UK-based manufacturing ensures a fast turnaround on bespoke orders, while our specialists prioritize tool-free assembly systems to reduce your setup stress. We provide the infrastructure you need to focus on what matters most: your customers. Browse our Professional Shell Scheme Graphic Panels today to elevate your brand presence. We are here to help you achieve a flawless install every time.
Frequently Asked Questions
Do I need permission from the exhibition organiser to hang my own banners?
You generally don't need formal permission to hang banners within your contracted space, provided they stay within the height of the shell scheme. However, you must adhere to the official exhibitor manual's rules regarding "full walling" and health and safety. At major UK exhibitions, regulations often stipulate that only 40% of any open side can be full-height walling over 1.2 metres. Always submit your Risk Assessment and Method Statement (RAMS) by the venue's deadline to avoid surcharges.
Will Velcro damage the shell scheme panels or frame?
High-quality Velcro is non-invasive and won't damage the aluminium frame if you follow the correct removal process. Use a citrus-based adhesive remover to clean any sticky residue left on the poles after the show. Organisers strictly prohibit screws or nails; using these will result in damage charges. Velcro remains the industry standard for how to hang banners on a shell scheme because it respects the "no damage" venue rules while providing a secure hold.
What is the best material for shell scheme banners: PVC or Fabric?
Fabric is the superior choice for aesthetics and sustainability. Statistics show 68% of trade show attendees value a company's sustainability practices, and reusable fabric graphics align with this expectation. Fabric also eliminates the glare issues common with high-gloss PVC under bright hall lights. PVC is better for rugged, short-term durability or when budget is the primary constraint. Tension fabric systems provide a more premium, seamless look that mimics a custom build.
How do I know which shell scheme system my exhibition is using?
Your exhibitor manual will specify the shell scheme contractor, such as Octanorm or Sodem. If the manual isn't clear, look at the technical drawings of your stand. Octanorm typically features 8-sided vertical poles with 4.3mm wide grooves. Knowing the system is vital for ordering the correct hanging hardware. If you're unsure, send a photo of the stand layout to your graphic supplier 12 weeks before the event for confirmation.
Can I hide the metal poles of the shell scheme with my banners?
You can hide the metal uprights by using graphics that are slightly wider than the internal panel dimensions. This "seamless" approach involves mounting your banners over the face of the aluminium poles rather than inside the frame. When executed correctly, this creates a continuous brand wall that conceals the modular nature of the stand. This method is the most effective way to elevate a basic shell scheme into a professional brand experience.
What should I do if my banner is slightly too wide for the panel?
If a banner is too wide, you can wrap the excess material around the vertical uprights. This is often intentional in "seamless" designs to ensure full coverage. Use heavy-duty Velcro to secure the overlap tightly against the side of the pole. Ensure the alignment remains level across the top horizontal beam. A 2mm error at the top can lead to significant bunching at the bottom, so use a spirit level during the initial placement.
Are there fire safety regulations for banners in UK exhibition halls?
All graphics used in UK venues must carry a fire retardancy certification, typically B1 or M1. Venue floor managers have the authority to test your materials or request proof of certification at any time during the build. Using non-compliant materials can result in the immediate removal of your display. Always ensure your supplier provides a valid certificate with your order to avoid logistical issues on the morning of the show.
How many people does it take to install shell scheme graphics?
While one person can manage small panels, a two-person team is essential for wide-format banners. One person holds the weight and ensures the horizontal alignment at the top, while the second person applies tension and secures the adhesive. This "two-person rule" prevents the banner from touching the floor and picking up dust, which can compromise the adhesive. A team of two can typically complete a 3x3 metre stand in under 45 minutes.
Leave a comment